> For the complete documentation index, see [llms.txt](https://survey.fmpx.docs.frox-it.de/llms.txt). Markdown versions of documentation pages are available by appending `.md` to page URLs; this page is available as [Markdown](https://survey.fmpx.docs.frox-it.de/messen-mit-totalstation/messung/absteckung/absteckungsprofile-definieren.md).
# Absteckungsprofile definieren
*Menü Extras / Programmeinstellungen*
Modul **M-FX Tachymeter Steuerung**
**Instrumentpanel - Absteckung**
## Absteckungsprofile nutzen
In den Programmeinstellungen finden Sie unter Tachymeter den Bereich Absteckung. Im Dialog Absteckungsprofil legen Sie fest, was und wie genau Sie etwas abstecken möchten. Die Profile können frei benannt werden, sodass Sie einen thematischen Bezug herstellen können, um z.B. bei Bohrpunkt-, Baugruben- oder Schnurgerüstabsteckungen mit einem Klick die gewünschten Einstellungen zur Verfügung zu haben.
Zweck der Absteckungsprofile ist es, zielgerichtet für bestimmte Aufgaben mit einem Klick eine Einstellung zu laden, die Art, Genauigkeit und Workflow der Absteckung beinhaltet. Unerfahrene Mitarbeiter müssen im Prinzip nur wissen, mit welchem Absteckungsprofil sie eine zu erledigende Absteckung durchzuführen haben, das Programm führt dann automatisch durch den gesamten Vorgang der Absteckung und zeigt auch an, wenn die geforderte Genauigkeit erreicht ist.
## Sammlung Absteckprofile
Unter Extras / Programmeinstellungen / Tachymeter klicken Sie auf Absteckungsprofile und anschließend rechts auf den kleinen Button ... in der zweiten Spalte, um Absteckprofile zu erstellen oder zu bearbeiten.
Es öffnet sich folgendes Fenster:
Wird ein bestehendes Profil angeklickt, so werden die Eigenschaften angezeigt und können eingesehen oder bearbeitet werden.
**Punkt 2D (Lage 5 cm)**
Punktabsteckung nur Lage mit Grenzwert 5 cm.
**Punkt 2D + 1D (Lage plus Höhe 5 cm)**
Punktabsteckung Lage und dann Höhe jeweils mit einem Grenzwert von 5 cm.
**Punkt 3D (Lage und Höhe 5 cm)**
Punktabsteckung Lage und Höhe in einem Schritt jeweils mit einem Grenzwert von 5 cm.
**Punkt 3D dynamisch (Hz, Vz)**
Die Höhendifferenz wird durch den VZ Wert aus Hz, Vz aktuell dynamisch neu gerechnet. Dabei wird die Strecke aus der Basismessung als Strecke verwendet. Grenzwerte werden nicht überprüft.
**Achse 2 D (Lage 5 cm)**
Achsabsteckung nur Lage mit Grenzwert 5 cm.
Für dieses Profil kann über den Button Erweitert... festgelegt werden, welche Wert für die Absteckung im Instrumentpanel angzeigt werden. Standardmäßig sind für dieses Profil folgende Werte ausgewählt.
**Achse 2D + 1D (Lage plus Höhe 5 cm)**
Achsabsteckung Lage und dann Höhe jeweils mit einem Grenzwert von 5 cm.
Für dieses Profil kann über den Button Erweitert... festgelegt werden, welche Wert für die Absteckung im Instrumentpanel angzeigt werden. Standardmäßig sind für dieses Profil folgende Werte ausgewählt.
**Achse 3 D mit Höheninterpolation (5 cm)**
Die Höhe zwischen Anfangs- und Endpunkt einer Achse wird interpoliert und mit der aktuellen Höhe als Minus (unter der interpolierten Achshöhe) und Plus (über der interpolierten Achshöhe) angezeigt.
Für dieses Profil kann über den Button Erweitert... festgelegt werden, welche Wert für die Absteckung im Instrumentpanel angzeigt werden. Standardmäßig sind für dieses Profil folgende Werte ausgewählt.
**Höhe mit Eingabe ohne MP (Höhe 5 cm)**
**Wegstrecke / Schnurgerüst (Lage 5 cm)**
Für dieses Profil kann über den Button Erweitert... festgelegt werden, welche Wert für die Absteckung im Instrumentpanel angzeigt werden. Standardmäßig sind für dieses Profil folgende Werte ausgewählt.
**Achse 2D Positionsentfernung / SP (5 cm)**
Für dieses Profil kann über den Button Erweitert... festgelegt werden, welche Wert für die Absteckung im Instrumentpanel angzeigt werden. Standardmäßig sind für dieses Profil folgende Werte ausgewählt.
## Neues Absteckungsprofil hinzufügen oder entfernen
Wenn Sie in der Standardliste kein passendes Profil finden, können eigene Profile definieren.
Mit \ wird ein neues Profil erstellt, mit \ können Sie ein bestehendes Profil löschen.
 Hinzufügen
 Entfernen
Für ein neu erstelltes Profil können die folgenden Eigenschaften eingegeben werden:
**Typ**
Bei Typ kann der Name des Profils bearbeitet bzw. ein neuer Name für ein Profil eingegeben werden.
**Kategorie**
Folgende Kategorien können ausgewählt werden.
**Lage und Höhe mit Grenzwert**
Für die Kategorien Punkt und Achse kann man nun entscheiden, ob man Lage und Höhe, nur Lage oder nur Höhe abstecken möchte, sowie die entsprechenden Genauigkeiten eingeben, die man bei der Anwendung des Profils erreichen möchte.
Für die Kategorie Punkt 3D sind Lage und Höhe bereits automatisch gesetzt (Felder sind ausgegraut) und es werden nur noch die Grenzwerte eingegeben.
Bei Auswahl der Kategorie Punkt 3D dynamisch müssen keine weiteren Angaben gemacht werden.
Über den Button \ wird das Profil gespeichert, und kann sofort im Instrumentpanel genutzt werden.
## Anwendung der Profile
Die Profile stehen bei der Absteckung zur Auswahl. Für 3D Profile ist dabei Voraussetzung, dass die Stationierung in 3D ist, sonst wird das Profil nicht angezeigt.
## Werte für die Abweichung bei der Achsabsteckung
Wird bei Kategorie eine Achse ausgewählt (Achse oder 3D-Achse mit Höheninterpolation), dann wird der Button \ aktiv.
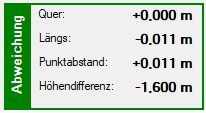
Bei Klick auf den Button \ öffnet sich ein neues Fenster, in dem ausgewählt werden kann, welche Werte bei der Absteckung angezeigt werden. Die Liste enthält zusätzlich eine Erläuterung dieser Werte. Es können maximal vier Werte ausgewählt werden.
Über die Pfeile können die Werte in der Liste sortiert werden. Dafür muss ein Profil angeklickt werden (grau unterlegt).
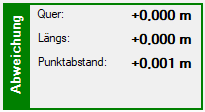
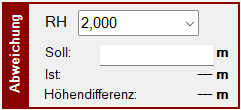
Diese Werte werden Ihnen im Instrumentpanel im Feld Abweichung angezeigt.
Die Positionsentfernung wird vor allem beim Profil Drehung benötigt, da hier die Werte Lageentfernung und Achslage nicht automatisch aktualisiert werden.
## Werte für die Abweichung bei der Achsabsteckung
Wird bei Kategorie ein Punkt ausgewählt (Punkt, Punkt 3D, Punkt 3D dynamisch), dann bleibt der Button \ ausgegraut. Die Werte werden automatisch je nach gewählter Kategorie angezeigt.
**Punkt**
**Punkt 3D / Punkt 3D dynamisch**
**Höhe mit Eingabe**
##
---
# Agent Instructions
This documentation is published with GitBook. GitBook is the documentation platform designed so that both humans and AI agents can read, navigate, and reason over technical content effectively. Learn more at gitbook.com.
## Querying This Documentation
If you need additional information that is not directly available in this page, you can query the documentation by asking a question.
Perform an HTTP GET request on the following URL with the `ask` and `goal` query parameters:
```
GET https://survey.fmpx.docs.frox-it.de/messen-mit-totalstation/messung/absteckung/absteckungsprofile-definieren.md?ask=&goal=
```
`ask` is the immediate question: it should be specific, self-contained, and written in natural language.
`goal` is what the user is ultimately trying to achieve, the reason they need the answer. Sharing it helps GitBook give you a better, more relevant answer. A goal is most helpful when it describes the outcome the user wants rather than restating the question. For example, with `ask=how do I create an API token`, a goal like `automate deployments from our CI pipeline` lets GitBook tailor the answer to that use case.
The response will contain a direct answer to the question and relevant excerpts and sources from the documentation.
Use this mechanism when the answer is not explicitly present in the current page, you need clarification or additional context, or you want to retrieve related documentation sections.